Hi there,
While I was trying to set up a lab for testing out SQL Server 2016 on clustered two node Windows Server Failover cluster running Windows Server 2012 R2, I kept getting the error in the screen shot below. I had no problem setting up the AD Domain controller, and two windows server nodes which will take part in the cluster. DNS worked just fine, long story short there was no issue at all. I tried two options where one was granting additional permissions to windows cluster network object (CNO) which did not work, and other one was to pre-stage the SQL Cluster prior to installation which did not work either.
Further search came up with the solution from Jonathan Kehayias's blog dated September 19, 2011. The simple solution was to remove 'Oracle VM VirtualBox Guest Additions'. I un-installed that software rebooted the servers and was able to install the SQL Server Cluster successfully. If you're not already following not only Jonathan's blog but everyone at SQLskills, I recommend to do so since you will benefit from their contribution immensely.
HTH,
Bulent
Monday, October 31, 2016
Monday, September 26, 2016
Hyper-V Manager Error 'General access denied error'
Hello there,
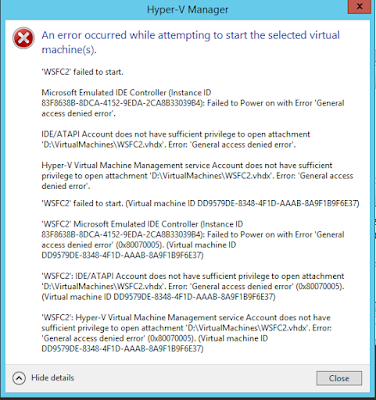
Recently I started using Hyper-V to set up a lab in my workstation. I created many virtual machines in a domain environment to test traditional Window Server Fail over Cluster with SQL Server 2016 and also other nodes for testing availability groups. Long story short I started running low on free space on my 256GB SSD so I ended up buying crucial MX300 750GB SSD for replacement. After copying the contents from the existing 256GB SSD into 750GB SSD I started checking everything out to make sure that copy process worked as expected. When I attempted to start the virtual machines in the Hyper-V Manager I kept getting errors for all the virtual machines and it basically said that the access denied. The screenshot of the error message captured below.
I thought somehow the file system permissions did not transfer properly and tried granting my account full access to the D: drive where I store the virtual machine files. To my suprise it did not change anything and the same error message appeared again. Then I turned to my favorite search engine and looked for a solution. Which was very easy to implement and I wanted to share it and keep a record of it in my blog in case I run into it again in the future.
The solution was to simple opening a Command Prompt (Admin) and gather couple of information for the command to execute and grant the necessary privileges to the virtual machine file. The command is;
icacls "path to vhd or vhdx file" /grant "NT VIRTUAL MACHINE\Virtual Machine ID":F
I knew the virtual machine file name and full path to it but I needed to find the virtual machine SID. To get the SID you need just click on 'See details' link on the error message window and it will expand the error window like below.
The last paragraph has the full path of my virtual machine file and the SID I needed for the command. So I just opened the Command Prompt (Admin) and I typed the command as seen below and then I was able to start the virtual machine and connect to it.
Happy virtualizations.
HTH,
Bulent
Recently I started using Hyper-V to set up a lab in my workstation. I created many virtual machines in a domain environment to test traditional Window Server Fail over Cluster with SQL Server 2016 and also other nodes for testing availability groups. Long story short I started running low on free space on my 256GB SSD so I ended up buying crucial MX300 750GB SSD for replacement. After copying the contents from the existing 256GB SSD into 750GB SSD I started checking everything out to make sure that copy process worked as expected. When I attempted to start the virtual machines in the Hyper-V Manager I kept getting errors for all the virtual machines and it basically said that the access denied. The screenshot of the error message captured below.
I thought somehow the file system permissions did not transfer properly and tried granting my account full access to the D: drive where I store the virtual machine files. To my suprise it did not change anything and the same error message appeared again. Then I turned to my favorite search engine and looked for a solution. Which was very easy to implement and I wanted to share it and keep a record of it in my blog in case I run into it again in the future.
The solution was to simple opening a Command Prompt (Admin) and gather couple of information for the command to execute and grant the necessary privileges to the virtual machine file. The command is;
icacls "path to vhd or vhdx file"
I knew the virtual machine file name and full path to it but I needed to find the virtual machine SID. To get the SID you need just click on 'See details' link on the error message window and it will expand the error window like below.
The last paragraph has the full path of my virtual machine file and the SID I needed for the command. So I just opened the Command Prompt (Admin) and I typed the command as seen below and then I was able to start the virtual machine and connect to it.
Happy virtualizations.
HTH,
Bulent
Monday, August 29, 2016
Get Size Information For All Tables in All Databases
Hello there,
I have been working on a small project to log and track the size and growth of the tables in all databases. So that overtime I can show the growth size and estimate the disk space allocation requirements for databases in production environment. Here is the script I used to capture the information. I used SQL Server Agent job scheduled to run once a day after midnight and store the results in a repository to be monitored and reported on later. You can uncomment the where clause to exclude system tables and tables with no records in them if you want.
SET NOCOUNT ON;
-- Get Table Statistics (Row Count, total space used)
IF OBJECT_ID('tempdb..#TableStatistics') IS NOT NULL
BEGIN
DROP TABLE #TableStatistics;
END
CREATE TABLE #TableStatistics (DatabaseName SYSNAME, SchemaName SYSNAME, TableName VARCHAR(128), TableRowCount BIGINT, TotalSpaceKB VARCHAR(20), UsedSpaceKB VARCHAR(20), UnusedSpaceKB VARCHAR(20));
EXEC sp_msforeachdb 'USE [?];
INSERT INTO #TableStatistics
SELECT
''?'' as DatabaseName
, s.Name AS SchemaName
, t.NAME AS TableName
, p.rows AS TableRowCount
, SUM(a.total_pages) * 8 AS TotalSpaceKB
, SUM(a.used_pages) * 8 AS UsedSpaceKB
, (SUM(a.total_pages) - SUM(a.used_pages)) * 8 AS UnusedSpaceKB
FROM sys.tables AS t
INNER JOIN sys.indexes AS i ON t.OBJECT_ID = i.object_id
INNER JOIN sys.partitions AS p ON i.object_id = p.OBJECT_ID AND i.index_id = p.index_id
INNER JOIN sys.allocation_units AS a ON p.partition_id = a.container_id
LEFT OUTER JOIN sys.schemas s ON t.schema_id = s.schema_id
--WHERE p.rows > 0 AND t.is_ms_shipped = 0 AND i.OBJECT_ID > 255
GROUP BY t.Name, s.Name, p.Rows
ORDER BY s.name, t.name' ;
SELECT *
FROM #TableStatistics;
DROP TABLE #TableStatistics;
HTH,
Bulent
Friday, August 19, 2016
How To Extend VirtualBox Dynamic Disk For Windows Server 2012 R2
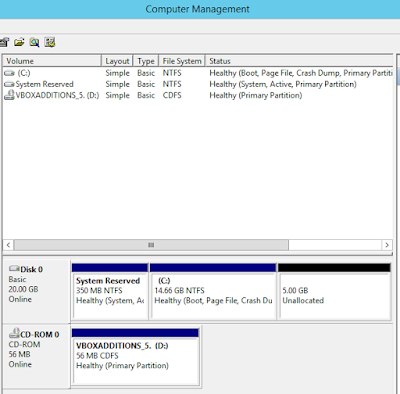
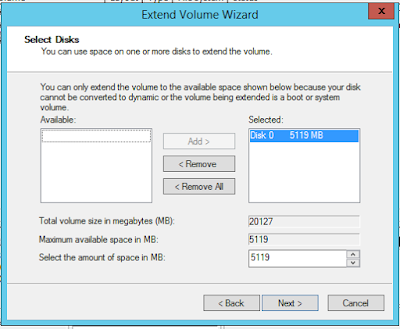
I wanted to set up a lab environment using VirtualBox to test SQL Server 2016. I first started with the installation of Windows Server 2012 R2 and 15GB space configured as dynamic disk. Installation went smooth and I then started the windows update process. After a while I started getting low disk free space and updates failed. Here are the steps I took to extend the disk and screenshots below them.
VirtualBox command to extend the dynamic disk:
vboxmanage modifyhd "pathToYourVHDfile" --resize 20480
And here are the screenshots.
HTH,
Bulent
- Shutdown the virtual machine that needs additional space
- Open up a command prompt with administrator privileges
- Change your folder path to where VirtualBox is installed
- Type the command above the first screenshot and provide the full path of the virtual disk you want to extend and the size you want to extend the disk to, command provided below extends the dynamic disk to 20GB
- Start the virtual machine and log in to windows
- Open the 'Computer Management' and under the 'Storage' section on the left side of the pane and click on 'Disk Management' and you will see the unallocated space for the disk you just extended using the command in step 4
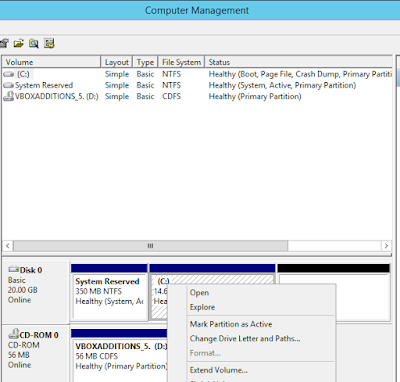
- Right click on the disk you want want to extend to bring up the context menu where you will see 'Extend Volume' option
- Click on 'Extend Volume'
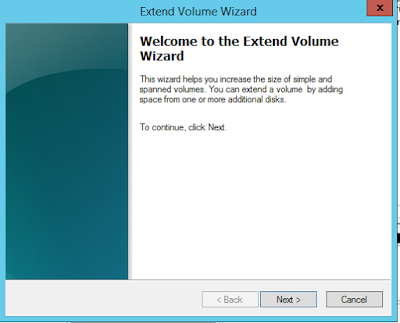
- This will bring the 'Extend Volume Wizard' and follow the steps in the wizard
VirtualBox command to extend the dynamic disk:
vboxmanage modifyhd "pathToYourVHDfile" --resize 20480
And here are the screenshots.
HTH,
Bulent
Friday, August 12, 2016
Find Size of the Indexes for Indexed Views
Hello all,
I have several scripts in my tool box to look into the indexes for tables, but did not have one for indexed views. I wanted to share a script that return the size of clustered and non clustered indexes for indexed views if exist in the context of the database where the script is executed.
HTH,
Bulent
SELECT
OBJECT_SCHEMA_NAME(v.object_id) AS 'SchemaName'
, v.NAME AS 'ViewName'
, i.index_id
, i.name AS 'IndexName'
, p.rows AS 'RowCounts'
, SUM(a.total_pages) * 8 AS 'TotalSpaceKB'
, SUM(a.used_pages) * 8 AS 'UsedSpaceKB'
, SUM(a.data_pages) * 8 AS 'DataSpaceKB'
FROM sys.views AS v
INNER JOIN sys.indexes AS i ON v.OBJECT_ID = i.object_id
INNER JOIN sys.partitions AS p ON i.object_id = p.OBJECT_ID AND i.index_id = p.index_id
INNER JOIN sys.allocation_units AS a ON p.partition_id = a.container_id
GROUP BY v.object_id, v.NAME, i.object_id, i.index_id, i.name, p.Rows;
Friday, July 29, 2016
The Principal "dbo" Does Not Exist
The full error message logged in the application log file is:
System.Data.SqlClient.SqlException: Cannot execute as the database principal because the principal "dbo" does not exist, this type of principal cannot be impersonated, or you do not have permission.
I run into the error message after restoring a backup that belongs to a client while trying to reproduce the issues they were having. When a database is restored the ownership of the database is assigned to the account running the restore command but in my case it was not that account. It was actually blank as seen in the database properties screenshot below.
So to fix the issue I run the command 'Alter Authorization On Database' to make a domain account owner of the database (see the screenshot below). In my case the domain account is the SQL Server Service account.
After running the command (see the screenshot below) the database property page shows the domain account as the owner of the database and the error message did not get logged into the application log any longer.
HTH,
Bulent
Tuesday, June 4, 2013
How to Change SQL Server Authentication Mode
Hello all,
I was asked to fix a connectivity problem for SQL Server 2008 deployed to test virtual machine. I was told that nobody was able to connect neither using sql server login nor windows login (neither SA account with generic password nor the local administrator of the windows server)
Since I have seen this in the past and heard about it, I knew what caused this problem. Basically it was the result of not granting access to any log in with right credentials. First thing I tried is to make sure that I am using a log in that has sys admin rights. For this I followed the steps in my earlier blog post (click this link to read that blog). Make sure to use strong password for the sql log in you just created.
Upon restarting SQL Server I attempted to use the new account I just created with no success. I kept getting login failed message. Then I wanted to check the SQL Server error log to see if any error message logged. In my situation I was able to locate the error logs stored at "C:\Program Files\Microsoft SQL Server\MSSQL10.Test01\MSSQL\Log" however in your case it might be different based on installation path and version of the SQL Server. Just by looking at the path you can tell that I am dealing with named instance installation of SQL Server and the name of the instance is 'Test01' and MSSQL10 means it's SQL Server 2008. If you're dealing with another version like SQL 2008 R2 you would see 'MSSQL10_50' and if you're dealing with SQL Server 2012 it would be 'MSSQL11'. And if you're dealing with default instance then instead of 'Test01' you would see 'MSSQLSERVER' in the path.
Anyway, I opened the file named 'errorlog' using notepad and started to scanning the entries. Within seconds I found an error message stating that 'login failed because of server is configured with Windows Authentication mode but the login is sql login'. At this moment I knew that I had to change the authentication mode to 'SQL Server and Windows Authentication mode' to gain access using the sql login I just created.
If you search the Internet you will find how to change the authentication mode during installation or changing the authentication mode using SSMS. However I had no way of connecting to SQL server via SSMS to change the authentication mode. But there is another way that it can be done. Of course this is not documented anywhere in MS knowledge base since it involves registry hacking!!!.
In my case this was a test server and I was OK if I ended up messing up the server and need to rebuilt it. If you're in the same situation and willing to do the same then keep on reading.
Open the command prompt and type "regedit" (without quotation marks) and hit enter. Make sure to backup the registry before making any changes. Then browse to the location for your SQL Server installation on the left pane. In my case it was the named instance of SQL Server which was named 'Test01'.
HKEY_LOCAL_MACHINE\SOFTWARE\Microsoft\Microsoft SQL Server\MSSQL10.Test01\MSSQLServer
And here is the path to default instance:
HKEY_LOCAL_MACHINE\SOFTWARE\Microsoft\Microsoft SQL Server\MSSQL10.MSSQLServer\MSSQLServer
Then on the right pane find "LoginMode" make a right click and click on 'Modify' then finally change the 'Value data' to 2, click ok and exit the registry editor.
Stop the SQL Server service and then restart it. Now your instance authentication mode has been changed to 'SQL Server and Windows Authentication mode' and you can use the sql login that you created to access and configure the server.
HTH,
Bulent
Subscribe to:
Posts (Atom)


